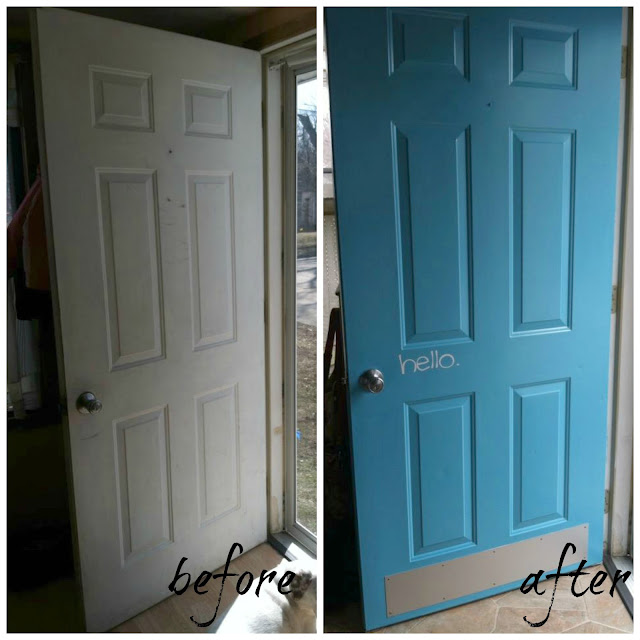
The hubs really isn't into fixing something "unless it is broken". He just doesn't see improvement the same way I do. So what is a gal to do?
Do it herself!
That's right. I have learned this week that just little projects make a huge difference!
I have been watching flyers for home improvement stores, that way I can get the best sales on things we need to update.
Luckily I hit a huge rebate sale (11% at Menards) and was able to get a new storm door for our front entry for less than $70! (after rebate - which is in-store, but I have many more projects to accomplish).
Our dining room in our in kitchen was an add-on to the house many moons ago (I think in the 70's) so it is settling a bit and our front doors into the house have shifted some because of it. It wasn't latching on its own, the dogs nice little nails tore the screen up, the hubs got angry at it because it wasn't shutting so kicked it, thus making it worse...etc.
It was at the top of my to-do list to replace.
That's when I spotted the wonderful full-glass storm door.
No screen for dogs to rip.
New latches so it will close.
Full-view so I can let the sunshine shine through and the dogs can enjoy sunbathing:
Aw. The great full-view storm door!
I recently had repainted my kitchen and added a chevron wall directly opposite of the front door.
(You can check out the chevron paint tutorial here)
So I wanted to make the front entry door really bold and stand-out (don't worry, exterior trim painting is coming up on my to-do list soon to make it jive better with the outside).
Oh yeah. I went bold and bright! I believe the color was something like "True Turquoise" or something along those lines. I need to grab the paint from the garage and double-check it.
If you need tips for painting a steel entry door here it is from me:
- Clean the door really, really, really well
- Use a really good-quality paint brush
- Paint the raised center rectangles first
- Then paint the indented portions around the raised parts
- Paint flat parts of the door going horizontally
- Then paint the flat parts of the going vertically
- Let the coat dry, then repeat, then repeat
The door was painted with ONE coat of white paint about nine years ago, and it was looking pretty grungy.
My husband works with ink (paper printing) so when he comes home the ink tends to end up on the door, so when he picked up the storm door for me, I had him pick up a kickplate for the front door also. It matches the doorknob and added a little something extra to the door:
Notice the "hello." decal?
My daughter thinks they are the funnest thing ever. "Our door says hello, mom!" {giggles} "and goodbye when they leave, too!!"
Yep! I decided to get fun, and add some vinyl decals to the door. I bought the "hello/goodbye" decals on Etsy from Blissfully Polished and of course a "no soliciting, please" decal from HouseHoldWords on Etsy, also. I put that on the outside of the storm door, since we love to have the inside door open so much now that it is warming up! They didn't cost much, shipping was very quick, and I was able to choose the color and font type that I wanted.
I love my bold front door!
The decals make it a little more, okay a LOT more fun than any of my neighbors. I was able to get it done quickly, in about two days total with the paint drying time, and the cost wasn't outlandish!
Storm door = $99
Kickplate = $20
Hello/goodbye = $6
No Soliciting = $7
Paint = $10
Minus sale rebates = -$30
Total for front door re-do = $112


LOVE the re-do! I can't wait to see it when we come bak on Monday!!
ReplyDeleteThanks! I am happy with it. The weather didn't cooperate this last week...so I was glad to get it done and other stuff inside. :)
Delete